We have SO many people asking pig candy questions, that we thought it would be a good idea to capture the process. We will be doing a full slab in this demo; however the same process can be followed for smaller pieces of pork belly.
Some Important Points.
FIRST of all, every piece of pork belly that you cook will be different, this cook requires intuitive cooking. That means thinking on your feet and reacting to what you see in front of you. (All cooking should be like this) Different size, thickness, and/or fat content, not to mention your own oven, choice of cooking vessel and even altitude will affect your cook.
SECONDLY, this is a long cook! BUT… please, keep in mind that the STOVE does most of the heavy lifting here, not you! As long as you have a timer set in between checks, you can happily go about your business in the house. Some stoves even have wi-fi assist and will message your phone with a ‘timer finished’ message.
It's IMPORTANT to Note...
Before we get started, I’ll ask you all to examine the colour of the fat. It’s super white and looks like a thick solid mass. As the pig candy cooks and renders, you will see the colour of the fat change and become opaque or see through.
As we progress through the cook, keep an eye on for that white colour to disappear and the pig candy to become more and more opaque as it renders.
**We DO NOT want to put any sauce on UNTIL the fat has properly rendered. THIS is our visual clue to follow.
Let's get Started!
Start with meat that’s REALLY cold. We always tuck the pork belly in the freezer for about 1/2 an hour before we cut. We don’t want the meat to be frozen, just good and cold. The colder meat will help you to make more precise cuts.
A good quality super sharp knife will also help your pig candy game. It doesn’t have to be Gordon Ramsay quality but try to have at least one good sharp knife in your culinary stable!
We use the large industrial sized sheet pans from Costco. They’re bigger and are a bit sturdier than most baking sheets. We’re all about the batch cooks and pig candy is no exception! If we’re doing a batch, we want enough so it lasts us awhile! The industrial sized pans also have higher (lipped) edges to ensure the rendered fat stays contained.
We cover the tray with foil (extra wide if you can get it) and then parchment paper. This keeps everything contained and has the added bonus of making clean up a breeze.
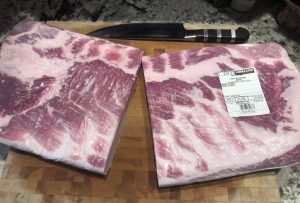
Start by cutting the full piece of pork belly in half to make it manageable. Then split each piece into thirds, creating 3 smaller sections that are about 4” wide.
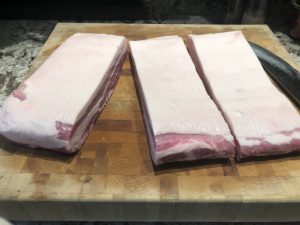
Each third should then be cut into little strips that are 1”.


Cut the little 4” strips/piece in half and then, in half again. The result…. Uniform square pieces that are about 1 inch.

TIP! Do NOT get a ruler and try to measure out 1-inch squares…do the split/cuts above for pig candy consistency.
Note that the inch measures may not be perfect (because of the varying size of the belly) but we have successfully sectioned dozens of bellies this way and the key is consistency. Most bellies are very similar in sizing so if your belly is slightly smaller or bigger, still use the cuts above to get consistency.

Our pig candy is now all cut and ready to season. Start with salt and pepper! While the seasoning that we’re using has salt and pepper in it, we always add SnP first, it helps to draw out the flavour of the meat.
Give the pieces a good sprinkle of salt on two sides. (scroll down to the picture where we add the ECK BBQ seasoning and use that as a roundabout/benchmark for how much salt to use) If you just add two or three grains of salt to a one-inch piece of pig candy, the flavour is going to be flat— salt is a flavour enhancer – don’t smother the meat but be generous.
Pepper next! About 1/4 of the amount of salt you used on both sides.
When your pieces are dressed in SnP, it’s time for ECK BBQ seasoning. If you haven’t discovered this recipe yet, you’re missing out! We always have a big jar of ECK BBQ seasoning ready for this and other recipes. Add about as much as you did salt above on both sides.
Our pieces are now seasoned and ready for the oven. Preheat your oven to 275 Convect or 300 Bake.
Tip! Forced hot air adds about 25 degrees to the equation. Subtract 25 degrees from any ‘Bake’ temp if you want to convect or air fry instead.
TIP! You can do this recipe at 250 all the way through but will take longer. We don’t recommend any higher than 275 as you want the fat to render down SLOWLY, higher temps will cook the meat faster and the end product won’t be the same.
Into the oven for increments of 45 minutes!
Set your timer!
First 45-minute check.
We swap the trays around, top and bottom, in the oven for consistency between the two levels. All ovens have hot spots and this helps get a more even cook. Back in the oven and set your timer for another 45 minutes.
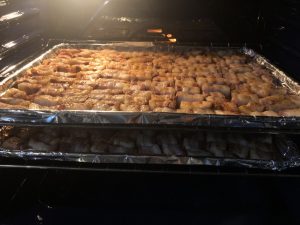
TIP! When we start spritzing, we keep track of which tray is which, so we can make sure to switch positions on the oven racks when putting them back in. We do this by removing the top tray first and then bumping the second tray up to the top position in the oven. This ensures when we put tray one back in, it goes to the proper spot.
Second 45-minute check.
Here we have the pan propped up on one side to start the process of draining the fat while we scoop. Scoop the partially cooked pieces into a bowl for a spritz of apple cider vinegar. The ACV acts as a meat tenderizer and also works as a flavour enhancer.
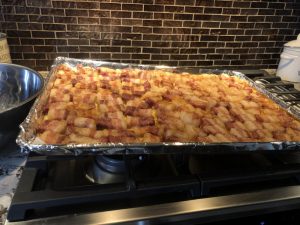
We use an oversized metal bowl for the ACV process. The big bowl lets you easily shiver/toss them around, they get all cozy with one another. Give the meat a good spritz and toss to coat.
While your meat is in the ‘tossing bowl’, carefully drain the fat that has collected on the side of the tray into another large bowl. That liquid gold will be put aside to become free keto fat/oil for the rest of the week.

Note the colour of that fat on the pig candy again now. There has a been a very slight change in the colour of the fat, but only just! We have a long ways to go yet…
Place your pig candy pieces back on the now drained tray and spread them out. One last spritz of AVC over top when the meat is on the tray and then back in the oven for another 45 minutes.
SET YOUR TIMER

Third 45-minute check.
Repeat what you did at the second check point. Note that the colour of the pork fat has started to change, its not as white as it was when it was raw, but still looks pretty solid. That’s a sign that we are not quite there yet, but we are getting closer.
SET YOUR TIMER!!

Fourth 45-minute check.
Repeat!! Look at all that liquid gold that we’ve rendered out so far!
We are almost there. Another big indicator of progress and nearing done-ness is when there is only a small amount of fat to drain off. This is the stage where most people run amok because they rush this part.

The fat isn’t quite rendered down properly yet. Lots of fat has drained off, BUT…

IF we put the sauce on now it will either leave you with a soggy goopy pig (not rendered) candy OR you will have to cook the sauced pieces soo long that the sauce scorches, and burns…
So, don’t put the sauce on yet, its still too early.
Repeat if necessary until…..
TIP!! All ovens are different, and all pieces of pork are as well. Some pork bellies will be already done at this point and others will need more time. Only YOU can make this decision in your own kitchen, using the tools we are giving here in this blog.
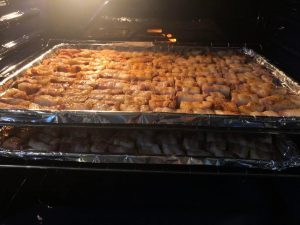
When there’s only a small amount of fat rendering off and the fatty parts of the pig candy almost look translucent, we are there. We are finished rendering!
Lets take a video look….
Now that the fat is properly rendered, we know that the meat inside is cooked to an appropriate level and our candy is ready to be sauced. We are finished with the vinegar and start tossing on the sauce to let that start to caramelize.
Just two coats! After the initial saucing, we go 20 minutes before the second/final tossing. Then recoat and in the oven for another 20.
IF your oven runs on the hot side, keep and eye here and maybe dial your oven back 25 degrees. Don’t let your sauce burn.
Finished!!
And the final result. Well worth the wait!!!

Perfect Pig Candy, each and every time!!!
That’s it for this time! Thanks for joining me for another East Coast Keto Life Lesson. There’s still a lot to learn and we’re glad you’re along for the ride!
Keep Keto-ing with one foot in front of the other. Keto seconds lead to keto moments, Keto moments lead to keto days. Keto days will take you on a successful keto journey life time. We’ll meet you THERE!!


This is a really clear fantastic post about making pig candy. Thanks
Thank you for your comment! Really appreciate the feedback.